
PixInsight is powerful post-processing software that makes it possible for you to apply advanced image processing techniques to your images to produce an excellent result.
One of the things imagers struggle with is noise: the fine, grainy noise that occurs due to having few exposures or short exposures.
PixInsight offers a range of processes that help you reduce noise: MultiscaleLinearTransform, TGVDenoise, and MultiscaleMedianTransform are three of the key processes that you can use to reduce the noise in your images.
Looking at each of the processes reveals a broad range of settings and choices and it can be difficult to find starting ranges for the settings, let alone find settings that work well for your images. While experimentation in PixInsight is key, it can be frustrating when you don’t really have any insight into what all the settings might do to your images.
While you can certainly learn how to use the noise reduction processes effectively, there is an easier option: NoiseXTerminator for PixInsight.
NoiseXTerminator uses artificial intelligence, a neural net specifically, to reduce the noise in your images. While you can use NoiseXTerminator with linear images, the neural net was trained on nonlinear/stretched images so it’s recommended to use NoiseXTerminator after stretching.
Result of using NoiseXTerminator
The following is a zoomed-in RGB image of M51 that’s been processed using NoiseXTerminator – slide over the image to compare:


Alternately, compare by hovering your mouse over the following image:
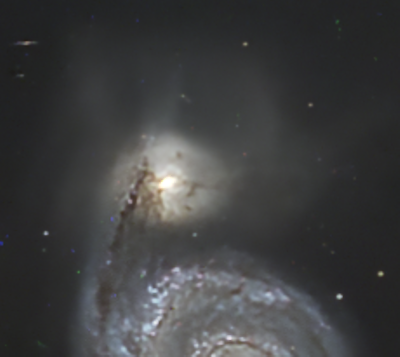

The reduction in noise is dramatic and NoiseXTerminator did not introduce any artifacts commonly associated with artificial intelligence-based imaging tools; NoiseXTerminator also performs some sharpening.
You can download the FITS files used for the observation here.
Acquiring and Installing NoiseXTerminator
Installing NoiseXTerminator is very easy – there are no files t copy or download; you do everything within PixInsight.
The process to install and license NoiseXTerminator is fully documented on the RC Astro website here:
https://www.rc-astro.com/resources/NoiseXTerminator/
Click the Free Trial link at the top and follow the directions.
Using NoiseXTerminator
NoiseXTerminator has only two parameters: Denoise and Detail:

Since processing can take some time, it’s recommended to create a preview area of your image that is at least 256×256 pixels and then apply NoiseXTerminator to the preview; not only is this relatively fast, but you can also easily undo and redo to be able to compare the effect’s results.
Adjust the Denoise slider to taste and adjust the Detail slider short of the point where dark halos appear around stars and note the increase in your image’s sharpness.
Once you have found settings that are good for your image, apply NoiseXTerminator to your whole image.
Understanding NoiseXTerminator
NoiseXTerminator uses artificial intelligence to recognize and reduce noise in your images. The artificial intelligence that NoiseXTerminator uses is called a neural network that’s made up of many parameters that adjust an image. A neural network learns based on training: the developer introduces a set of original and modified images to the network and it modifies its internal parameters to mimic the effect between the original and modified images. The neural net was essentially trained on how to create noiseless versions of your images without adding artifacts.
Conclusion
In this article, you learned about NoiseXTerminator, saw the result of using it, learned how to use it, and learned a little about its implementation.
You must be logged in to post a comment.