
Update October, 2023: The EZ Processing Suite is no longer available in PixInsight
Deconvolution is a restorative process that attempts to sharpen the fine detail lost through atmospheric disturbances during your observation.
The process of deconvolution is very involved: you have to create a PSF image by measuring certain stars in your image (the PSF image critical because it helps the deconvolution algorithm restore the details in your image), you need to create a star mask to protect the brightest stars, you need an object mask to indicate where you want sharpening to occur. Once you have done all that, you use the Deconvolution process to figure out what settings work well for your image. And after all that work, you’ll often find that the result is very subtle – perhaps too subtle to notice, depending on how you intend to present your image.
When working with the Deconvolution process, you’ll run into problems with ringing around the stars in your image and the problem is so prevalent that there are settings within the Deconvolution process dedicated to just managing ringing artifacts.
Fortunately, there’s a much easier method to deconvolve your image: the EZ Decon script that’s part of the EZ Processing Suite.
Update October, 2023: The EZ Processing Suite is no longer available in PixInsight
| Update December, 2022: There;s a more effective process available for deconvolution, called BlurXTerminator and you can read about it here along with a tutorial. |
Result Of Using EZ Decon
Here’s a zoomed image of M16 – the Eagle Nebula; it is a luminance image so it is a monochrome image:
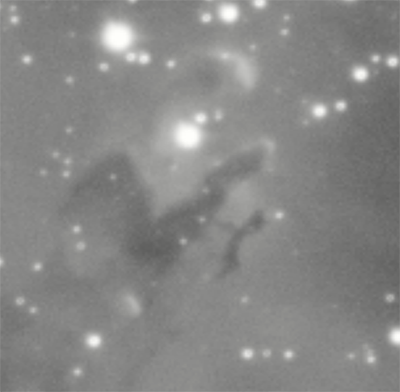
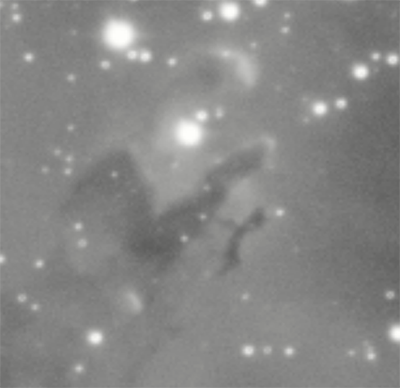
Hover your mouse over the image to see the result after EZ Decon.
The result is very subtle but it is most noticeable in the smaller structure to the right of the large pillar – move your mouse over the image, and away from it repeatedly to see the sharpening effect.
As I mentioned earlier, deconvolution often produces a subtle result so whether you use it depends on how you plan to present your image (whether your users will be interested in those details).
What EZ Decon Does
EZ Decon works by creating a star mask from your image, it then creates a mask for where sharpening will occur, and it creates the critical PSF image by only measuring the correct types of stars in your image. EZ Decon gets around the problem of ringing around stars by removing them from the image, sharpening the image, and then returning the stars to the image. As a result, there’s a section in the EZ Decon settings dedicated to creating and editing the star mask.
Requirements of EZ Decon
Update October, 2023: The EZ Processing Suite is no longer available in PixInsight
EZ Decon makes use of the StarNet process. Your computer must be capable of running StarNet and typically computers made after about 2011 are compatible. Check your computer by running the StarNet process with one of your own images to find out if it works on your system. If StarNet does not work on your system, you won’t be able to use the EZ Decon script.
Alternately, if you have StarXTerminator, use it to create the star mask and specify that image when using EZ Decon.
Sample Download
I have made a sample observation of M16 available for download. This is a luminance image and has been processed to flatten the background using PixInsight’s DynamicBackgroundExtractor and has been denoised using the EZ Denoise script for PixInsight.
Download the sample observation of M16 here
Using EZ Decon
Open an image that requires deconvolution; the image must be in the linear state and it is recommended that you use a background modelization process like DynamicBackgroundExtractor to even out the background of your image (you could use the sample image that I made available with this article to follow along). You could also reduce noise in your image and I explain how to do that using another script that’s part of the EZ Processing Suite, called EZ Denoise.
With your image open on the PixInsight desktop, start EZ Decon by selecting from the menu Scripts – EZ Processing Suite – EZ Decon. If you don’t see the EZ Processing Suite of scripts under your script menu, I explain how to install EZ Processing Suite in this article.
Update October, 2023: The EZ Processing Suite is no longer available in PixInsight
You’ll see a warning that explains that PixInsight could crash when using the script, so it is recommended to save all of your work before proceeding.
Where it says ‘<No View Selected>’, click the arrow next to it and select the image you wish to deconvolve – typically, this is a luminance image or the image with the most signal in it.
Click the button labeled ‘Create New Processed Star Mask’ This option creates a star mask that uses processes like binarization, convolution and dilation applied to it. You have the option to supply your own star mask (which you may have created ahead of time by using, for example, StarXTerminator), and you have the option to edit the star mask as desired using the buttons in the Edit Star Mask section of the window. Your screen will display the star mask on the right side of the window.
Next, you’ll need a mask for the background of your image. Click the button labeled ‘Create Background Mask’. You have the option of supplying your own background mask if you prefer, using the dropdown above the button. Your screen will display the background mask on the right side.
Next, you’ll need to create a PSF image. The PSF image gets created by measuring only certain stars in your image.
Click the Deconvolution tab at the upper part of the window on the left side of the screen, then click the ‘Generate PSF’ button to generate the PSF. Once complete, the right side of the screen will show the PSF image.
Next, evaluate your settings by clicking the button labeled ‘Evaluate EZ Decon Run’.
Once finished, the right side of the screen will show your deconvolved image. You can zoom in using the magnifying glass icon and once zoomed in, you’ll be able to pan around your image to inspect it:

Across the top of your image are the tabs for the various images that EZ Decon produced – you can flip between your original image and the deconvolved image by clicking the button at the upper-right labeled ‘Change To Original’ – the button changes its label once you do that and you can click it again to flip back to the deconvolved image.
If you’re satisfied with the result, click the button on the right side labeled ‘Run with these settings’ and wait for the process to complete.
If you’re not satisfied with the results, try adjusting the wavelet strengths and iterations. You can also edit the masks using the buttons on the Masking tab’s Edit Mask section if you see ringing artifacts.
Conclusion
In this article you learned about EZ Decon, part of the EZ Processing Suite for PixInsight. I described deconvolution, demonstrated a before and after view, explained how EZ Decon works, and walked you through deconvolving an image.
More Articles In This Series
This article is part of a whole series of articles about processing images using PixInsight:
- If you are using the LRGB/broadband processing workflow, click here for the index article for processing broadband images.
- If you are using the narrowband processing workflow, click here for the index article for narrowband images.
| Update December, 2022: There;s a more effective process available for deconvolution, called BlurXTerminator and you can read about it here along with a tutorial. |
You must be logged in to post a comment.